

How To Create Your Own Pattern
The Basics of Patternmaking for Fashion
Fitting for Apparel DesigN - Section 1: Introduction to Patternmaking
Welcome to Section 1 of a FREE 5 part series, Fitting for Apparel Design. In this series we will cover everything you need to know to fit your garment samples and create a perfect fit for your brand. If you'd like to read more about what is included in this series, please take a look at this overview of Fitting for Apparel Design.
In this first section we will be covering the basics of patternmaking and how this knowledge will allow you to create the perfect fit your apparel brand. Patternmaking is an essential skill to learn and understand in order to fit garments appropriately. Patternmaking can be quite complicated! In this section we will be walking through the basics of patternmaking so that you can have a great foundation to start from. I hope to create a more in-depth patternmaking tutorial in the future, but this is a comprehensive overview of the essentials!
This post contains affiliate links. Learn what that means for you and for me .
Learn in whichever way best suits you!
Watch the video below or scroll down to read the full post.
Follow me onYouTube for more educational videos!
PATTERNMAKING
First off, let me clarify that patternmaking can be spelled with or without a space (ie. patternmaking / pattern making). I learned to write it without a space, but other professionals include a space! It's really up to you how you'd like to write it and there is no "right" way.
What is patternmaking?
Patternmaking is the foundation of a garment. To put it very simply, patternmaking is plotting the measurements (or specs) to create a paper template of a garment. That template is then used to cut fabric to be sewn into a garment.
Typically, patternmakers will start with a sloper and adjust it to make specific style patterns. A sloper is a simple pattern with no seam allowance, style lines, or ease. Once the garment is spec'd out in paper format (patterned) it can be made into a muslin sloper. From there, adjustments are made to the fabric prototype (muslin) to perfect the fit. Those adjustments are then transferred back to paper and trued for the finalized pattern.
Why Do I need To understand patternmaking for my fashion business?
"But Natalie, I'm not a patternmaker and I don't have any intentions of being one! Why do I need to know this as a brand owner?"
I'm glad you asked! If you are not intending to make your own patterns and you are a part of the fashion industry, I still encourage you to read through this information. In this case, the more you know about patternmaking the easier it will be for you to accurately fit your prototype garments when they come in. You will also be able to communicate the changes you need from the factory much better! With this knowledge you will save a ton of time and money through the development process.
Glossary
Here is a quick list of defined terms and tools you may need for this tutorial.
Patternmaking terms
-
Grain - The direction in which the yarn of a fabric is woven or knitted.
-
Bias - A line that intersects with the warp and weft at a 45˚ angle. Used when maximum stretch is needed for draping.
-
Seam Allowance - The allotted fabric beyond the pattern for stitching garments together.
-
Style Line - Seams that give the garment shape such as a princess seam.
-
Ease - The amount of space between the body and the garment (tightness vs. looseness).
-
Sloper - A simple pattern with no seam allowance, style lines, or ease.
-
Muslin Sloper - A garment constructed from the sloper pattern with muslin fabric. Used to perfect the fit of a pattern.
-
Trueing - The blending and straightening of pattern lines for the purpose of creating correct seam lengths.
-
Block - An unchanging base pattern that provides consistent balance and key measurements as a starting point for garment development.
-
Fit Intent - How a garment is meant to fit in terms of ease over body, end use, and comfort.
-
Design Intent - The intended silhouette, shape, proportion and design elements of a garment.
-
Selvage - The finished edge on the lengthwise grain of woven fabric.
-
Bust Point (pivotal point / apex) - The apex of the bust as designated on the pattern.
-
Dart - A cut-out in a pattern used to create shape.
Patternmaking Tools
-
Vary Form Curve (or sometimes written Variform) / Hip Curve - Used to shape and blend patterns, typically at the hip and waist.
-
French Curve - Used to shape and blend patterns, typically at the neck and armhole.
-
Measuring Tape - Used to measure curved shapes and forms.
-
Quilting Ruler - Clear ruler to see the lines of the pattern and make quick adjustments.
-
Tracing Wheel - Transfers pattern to paper or muslin using carbon paper.
-
Awl - Used to add a hole in the pattern for marking details, like darts.
-
Pattern Paper - Gridded paper for patternmaking.
-
Notcher - Notches the pattern to transfer design lines such as dart legs.
-
Pattern Tape - Special tape that will not rip the pattern paper when removed. Used when making adjustments to the pattern.
-
Pattern Weights - Holds the pattern when tracing or transferring to fabric.
How to create a pattern
To keep it simple, let's walk through how to create a simple front bodice pattern piece. Now, there's several ways to approach this. First, you will need to decide who you are creating the pattern for. Is this for a specific person? A size for your fashion brand? Or do you love the fit of a retail sample you own? For this example, we're going to be making a front bodice pattern for a size in our size set for our brand. I already have a size chart made and therefore know the size for this example pattern. If you need help creating a size chart checkout this tutorial, or you can buy pre-made size charts as a part of the Tech Design DIY Kit.
If you are referencing a specific person or a retail sample (garment) you will need to measure the person or garment. I have a full tutorial on how to measure a garment. If you're measuring a model (or yourself) I suggest picking up Patternmaking for Fashion Design by Helen Joseph-Armstrong. This book walks you through how to plot points based on your measurements. It has worksheets, calculations, and a step-by-step process to create patterns! If you're interested at all in creating your own patterns, I highly suggest this book.
Ok, now that we know who the pattern is for we need to determine what type of garment this is. The type of garment, design intent (fit), and fabric play a huge role in determining how you will plot your pattern. For this example we are going to be making a very simple bodice (front only) sloper. The design intent is fitted and the fabric is woven (no stretch).
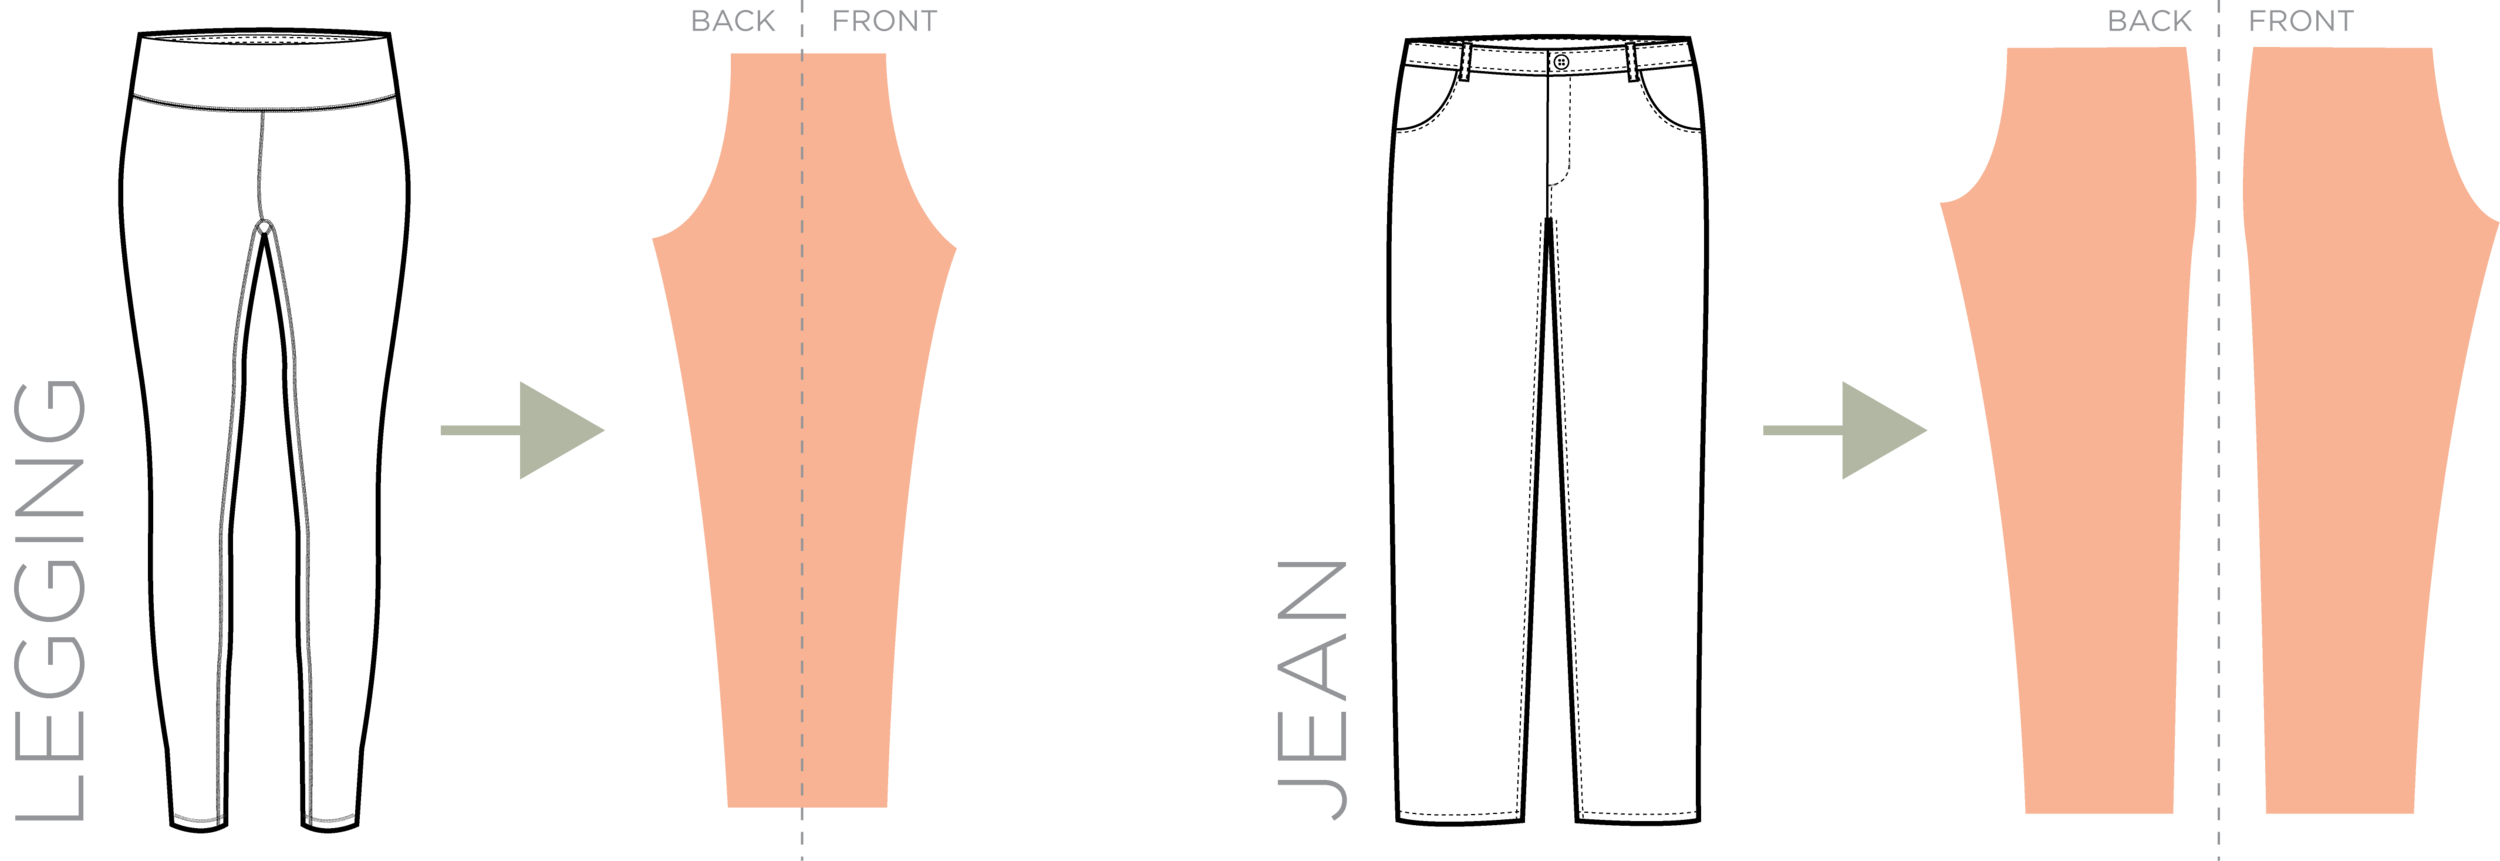
To help you understand this a little bit better let me use this example:
Imagine a woman owns a pair of jeans and a pair of leggings, both garments fit her well, but when off of her body the leggings appear much smaller. That is because the design intent of the leggings is bodycon and the fabric is a knit (stretch) and the design intent of the jeans is fitted, but the fabric is a woven denim (non-stretch). Therefore, the patterns for the leggings and the jeans are very different. Here's an example of what those patterns may look like:
Here's the info we've gathered so far for our example:
-
WHO: Medium (Ladies) - from our size chart
-
GARMENT TYPE: Bodice (we'll be patterning the front only)
-
DESIGN INTENT: Fitted Sloper
-
FABRIC: Muslin (woven - no stretch)
Ok, so now that we know who we are making the pattern for, what our design intent is, and our fabric choice we can begin plotting our points. For this part of the tutorial please reference reference the video above to see how I manually plot a pattern. The manual patternmaking section starts at 07:17.
Remember, this is just one piece (front) of a full top! Now that you know how a pattern is built, you can see how changes to the design of a garment in a fit session will effect the pattern. We'll be talking more about common fit issues, how to fix them, and what that means for the pattern later on in this series.
patternmaking principles
There are 3 principles to be aware of when making edits to the pattern for better fit:
-
Dart Manipulation - How the location of a dart is changed within the pattern. A dart can be transferred to any other point around the pattern (in relation to the pivotal point - bust point) without changing the fit of the garment.
-
Adding Fullness - Applies when the excess fullness needed is greater than that of the dart. The slash and spread technique (below) is used to add fullness where desired.
-
Contouring - Absorbing the dart excess into style lines to create a contoured silhouette.
Identifying common Pattern Shapes
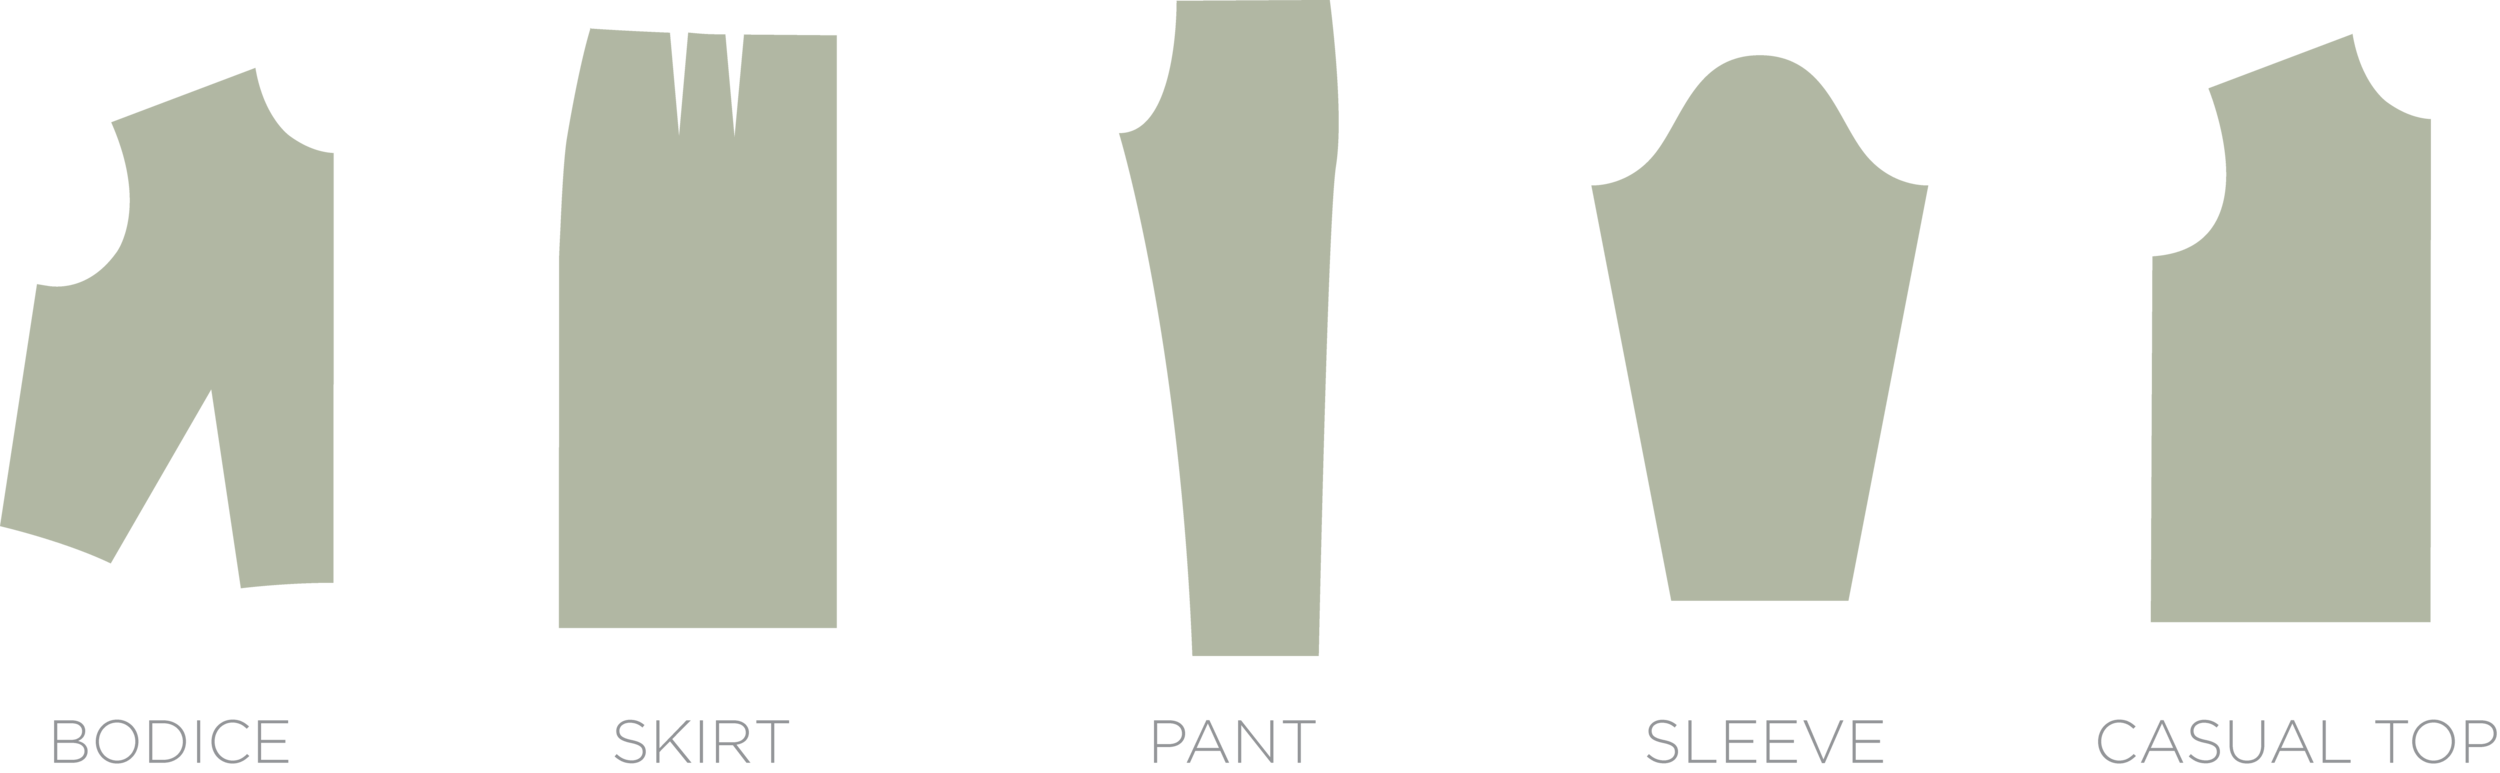
Being able to quickly identify pattern shapes while working with your factory or patternmaker is essential for clear communication! Most of the patterns you will see may vary slightly from these outlines, but as long as you understand the foundational shapes you'll be able to identify what type of garment pattern you're looking at.
Pattern Manipulation Techniques
When using a sloper to create a stylized pattern, we often will add or change design lines. This means that we need to transfer the shaping (darts) to our new desired style lines. There are two manipulation techniques:
-
Slash and Spread - The new design line is cut and spread open to create a new dart, while the original dart is closed. The working pattern is altered.
-
Pivot - The pivotal point (bust point or dart point) stays stationary. The pattern is traced and pivoted to close the old dart and create the new dart. The working pattern is not altered.
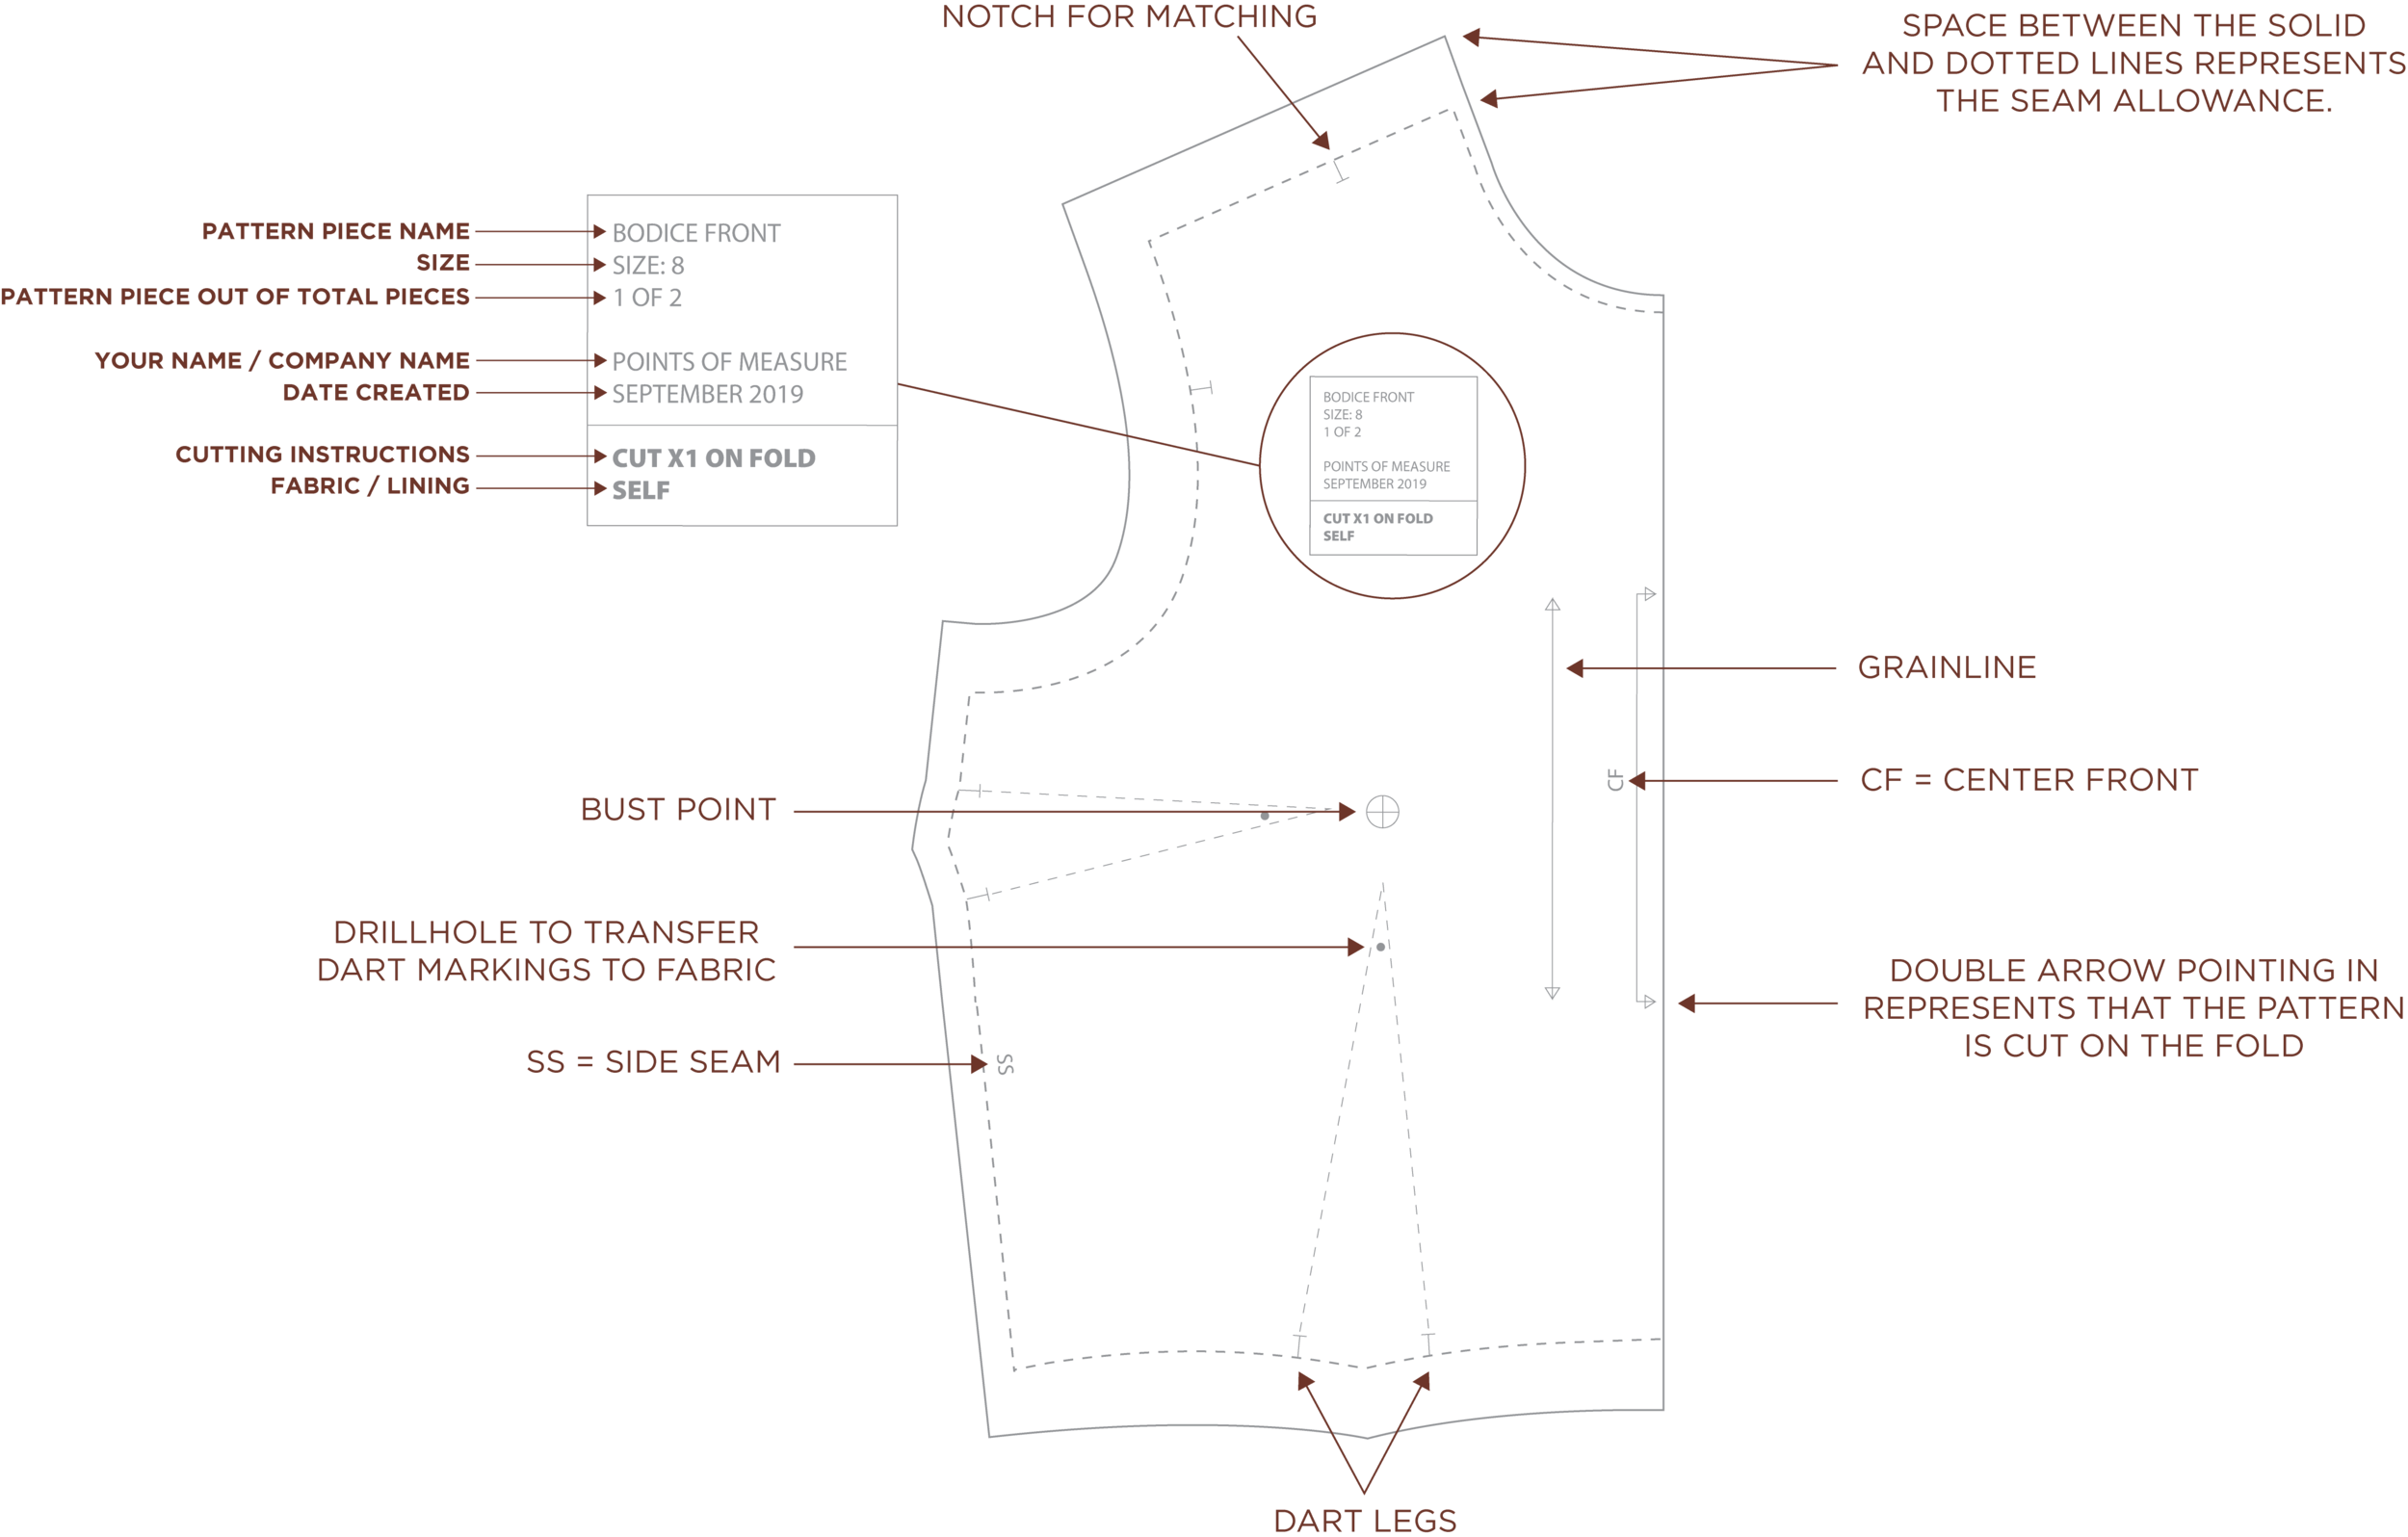
Pattern Labels and Markings
Here is a basic diagram to show you how patterns are commonly marked and labeled. Depending on the pattern, you may see some other more specific markings, but this will give you a good foundation for understanding the markings of a pattern.
DIGITAL PATTERNMAKING
What is Digital Patternmaking?
Digital pattern making is achieved in much the same way that traditional (paper) patterns are created. Patternmaking software takes the specs from your Tech Pack, plots the points, and creates a digital pattern. This can be manipulated and printed from the pattern software. If you are creating your own patterns, you can also digitize them by using a program you probably already have - Adobe Illustrator (read more on this in Method 2 below).
Digital Patternmaking methods
Method 1: CAD Pattern Software
Pattern software is the most common way you will see digital patterns being created. Factories use this method when creating the pattern, based off of your tech pack specs. To put it simply, the factory will enter your requested specs into their software system, then the computer does its magic! The points are plotted, using advanced calculations, into the requested pattern size. In most cases, some adjusting will need to occur in order for the pattern to be correct. This is why it's important to include tolerances in your tech pack (as well as for construction and cutting variables).
Did you know that CAD software is available to the public? You don't have to be a large factory to access these programs! This allows freelancers and small design firms to use the same tools as the factories that they work with. For example, Xochil uses StyleCAD and a plotter to create and print her patterns. Xochil, The Chicago Patternmaker, was kind enough to lend us her expertise in CAD software and printing! Take a look at her method for developing and printing digital patterns:
Xochil Herrera Scheer, The Chicago Pattern Maker
"Now that your pattern is made in CAD, in order to cut and sew a prototype in your fabric, you need to print it out! Some people may be familiar with downloadable home sewing patterns which can be printed at home on standard paper, then taped together, or as a large format PDF which can be printed at a print shop such as FedEx. When I first purchased my CAD system I did not purchase a plotter at the same time due to the expense, so I started out by exporting my pattern files to Adobe Illustrator, and then printing at FedEx from a PDF. This added a lot of time in the extra steps I had to do to prepare the files, as well as time and expense of printing at FedEx multiple times a week. After 6 months I decided to make the investment into a plotter. I researched a few different companies and types of plotters to see what would work best for my needs, deciding to purchase from Velocity Plotters since they were very helpful and service oriented (despite being located across the country from me), and I'm glad I did. They helped me to remotely set up and configure the plotter to my CAD system (I use StyleCAD), but it's also compatible with multiple file types including vector-based PDF documents. It also works with other CAD systems in case I ever want to switch programs in the future, or I can print files from colleagues easily as well.
There are different paper widths and features available, since I work on the product development side, my needs are primarily for printing markers for prototyping, and not for production, so I opted for a 49" wide plotter which fits into my home office. For production, plotters go up to 72" so that they can accommodate wider width fabrics; for this I send jobs to my trusted colleague OnPoint Patterns. Other times a client's factory may have the capability to receive pattern and marker files and will plot themselves or use an automated cutting system.
When I'm ready to plot a pattern, I set up the sample marker in my CAD program and print to a PLT file. Then I load that into my plotter's program and print it out. The marker is either placed on top of the fabric and cut together (paper and fabric layered, this is how you would cut in production), or if the fabric is slippery I will cut out the pattern in paper first, then place on fabric and cut the fabric layer alone.
Digital pattern making and markers have the wonderful ability to be edited easily, but also to be used and printed anytime you need, and by different people in your supply chain.
Although there is paper consumption, the paper is easily recyclable, and is more accurate over time than tracing from an oak tag pattern, particularly in production.
Having a plotter in house means being able to prototype more rapidly, and is an important asset and tool for digital pattern makers."
Method 2: DIY Digital Patternmaking
CAD programs and plotters are essential tools for the development of RTW collections, but may not be the most affordable option for home sewers and freelance designers. Well, I'm here to tell you there's another option. You can create your own patterns in Adobe Illustrator. Yup, you heard me right! AI is technically a CAD program, but is much more accessible. In fact, I bet that you probably already have it on your computer if you're in the fashion industry. And if you've read my series, Introduction to Technical Flats, then you already have all the skills you need to use AI to create patterns.
Methods for Digitizing Your Pattern in Illustrator
-
Create your pattern by hand (paper) then scan it into your computer and trace the image using Illustrator (or other digital art program). Just make sure that your image is not being scaled or your measurements will be skewed. This is a great method if you are draping your patterns and want to save digital versions.
-
Or (my favorite) plot your points for your pattern directly in Illustrator.
How to Create a Pattern in Illustrator
You will follow the same steps as we did for our paper pattern to plot your points! I've included a walkthrough of how I create my digital patterns in Illustrator in the video above. This part of the tutorial starts at 19:23 and is a continuation of the manual pattern walkthrough earlier in the video.
Here are some helpful tips you may not know about:
-
Make use of the rulers, grid, and guides to help you plot your points.
-
You can set your document to inches (or centimeters, etc.) under File > Document Setup.
-
You can see the length of any line by going to Window > Document Info. Once you see the Document Info window, you can use the menu dropdown on the top right to access it's options. Select "Object" and when you click on your path you will see the first line shows the length of your path in inches.

-
Or you can purchase plugins like Vector Scribe that show you the length of a line as you draw it.
-
Note that new versions of Illustrator now include a line length indicator as you draw! This negates needing to use a plugin or using the Document Info window and makes the process much easier. I talk more about this in the video.
-
You can create your own curved rulers as objects! Or take advantage of my pre-made digital rulers that are a part of the Fitting DIY Kit (more on that below). Update: the Fitting DIY Kit has now been split into multiple options (below). You can now purchase the digital curve rulers separately or as a part of the Foundation Pattern Kits.
-
Use layers to your advantage! They are great for separating reference patterns and/or photos. Later in the series we will touch on how important layers are for creating nested grades.
-
You can use Illustrator's scale and blend tools to grade your digital pattern up or down, make simple edits, and scale it for a half form virtually instantly! More on this when we get to the digital grading section of this series.
-
Use Illustrator's Offset Path to automatically add seam allowance.
-
You can specify the distance an object moves when using your arrow keys. I have mine set to 1/8" to make easy adjustments. We'll talk more about this in the grading section of this series.
Printing Your Digital Patterns at Home
-
Save and print as a PDF. You can also print directly from Illustrator.
-
Double check that your printer is not scaling your patterns. Check them again once they are printed!
-
Set your printing borders to as small as possible.
-
Do not overlap your artboards! Simply line them up edge to edge and place your pattern on top. I've saved my pattern printing setup as a template to easily use anytime.
-
Add a coding system to each page. I code mine by row (letters) and column (numbers). This has saved me many times when my printer skipped a page or printed out of order!
-
Tape row by column and true up any missing lines (each page will have about an 1/8" border). Then cut out of the larger sheet. Double check your scale again!
-
You can also cut apart your patterns (digitally) to fit on individual pages, then cut out, match up, and tape together. I like to add a star on the cut line to make sure I'm matching it up just right.
Now available
FITTING TOOLS
You may also like:
How To Create Your Own Pattern
Source: https://www.pointsofmeasure.com/tutorials-education/the-basics-of-patternmaking
Posted by: garciajacessid.blogspot.com
0 Response to "How To Create Your Own Pattern"
Post a Comment